Using Digital Micrometers
Measure small thicknesses with a digital micrometer, control contact force and correct a signed zero offset. Analogue sleeve and thimble reading is an optional extension.
On this page
1. Definition
Digital micrometer (required practical instrument)
A digital micrometer measures very small thicknesses/diameters (e.g. wire) and displays the reading directly in mm. The K323 apparatus list specifies a digital micrometer reading to 0.001 mm.
2. Key Ideas
- Zero first: the micrometer should read zero when fully closed.
- Use the ratchet or specified constant-force control to keep contact force approximately consistent; do not force the spindle against the object.
- Zero-error correction (both signs): correct reading = observed reading - zero error.
3. Detailed Explanations
A. Digital micrometer workflow (quick)
- Clean the contact faces and close gently with the specified force control. Check the reading, then set zero if appropriate. If an unremoved zero offset is supplied, correct the measured reading instead.
- Place the object between the anvil and spindle.
- Tighten using the ratchet until it clicks (consistent force).
- Record every digit the display shows, with units (e.g.
1.764 mm). Keep a final zero:1.760 mmis a reading to 0.001 mm.
For example, if an unremoved closed reading is +0.003 mm and the wire reading is 0.520 mm, subtract the offset to obtain 0.517 mm. If the zero was successfully reset before measuring, do not subtract the old offset a second time.
If it will not zero, use the signed correction: see Accuracy, Precision & Measurement Errors.
F. Technique tips (accuracy + repeatability)
- Clean the anvil/spindle faces and the object.
- Use the ratchet (don’t overtighten).
- Repeat at the same position to check scatter, and measure at different positions to check actual diameter variation. A mean estimates an average; it does not correct zero error or remove real unevenness.
- For cylindrical objects, rotate the object about 90° and re-measure; a large difference suggests the object is not perfectly circular.
Work with digital readings
Common misconception 1
Classify the error type
Learner response
A micrometer does not read zero when fully closed. A learner calls this random error and says averaging several wire-diameter readings will remove it. Locate the first error and explain the correct classification.
Diagnose before viewing the correction
View solution step by step
Classify the constant offset
Method
Identify it as a systematic zero error.Reason
The micrometer adds the same signed offset to every reading.Working
All observed diameters are shifted in one direction.Choose the correct treatment
Method
Measure and subtract the signed zero error or re-zero the instrument.Reason
A mean reduces random scatter but retains a constant offset.Working
Use correct = observed-zero error.
Challenge 2
Convert a micrometer reading into metres
SI-unit transfer
A wire diameter is measured as 0.52 mm. Write this in metres and preserve the measurement’s significant figures.
Convert without the worked method
Hints
Hint 1: use the milli prefix
1 mm = 10⁻³ m.
Hint 2: normalise scientific notation
0.52 × 10⁻³ = 5.2 × 10⁻⁴.
View solution step by step
Apply the prefix factor
Method
Replace millimetres with 10⁻³ metres.Reason
The prefix milli denotes one thousandth.Working
0.52 mm = 0.52 × 10⁻³ m
Write standard scientific notation
Method
Move the decimal one place right and reduce the exponent by one.
Reason
Standard scientific notation uses a coefficient from 1 to less than 10.
Working
0.52 × 10⁻³ m = 5.2 × 10⁻⁴ m
Try a digital measurement independently
Mind stretcher 1: Keep the sign and displayed digitsExtension
A digital micrometer reads −0.004 mm when closed, then 1.760 mm around a wire. Calculate the corrected diameter and express it in metres. Would averaging ten uncorrected readings remove this constant offset?
Show answer
The corrected diameter is 1.760 mm-(-0.004 mm) = 1.764 mm = 1.764 × 10⁻³ m. Subtracting a negative offset increases the result. Averaging does not remove a constant zero offset; correct it first and preserve the display’s 0.001 mm increment.
B. Micrometer screw gauge (analogue)
A micrometer screw gauge uses a sleeve (main scale) and a thimble scale to read lengths to a fine resolution (commonly 0.01 mm).
B. Analogue micrometer parts and scales
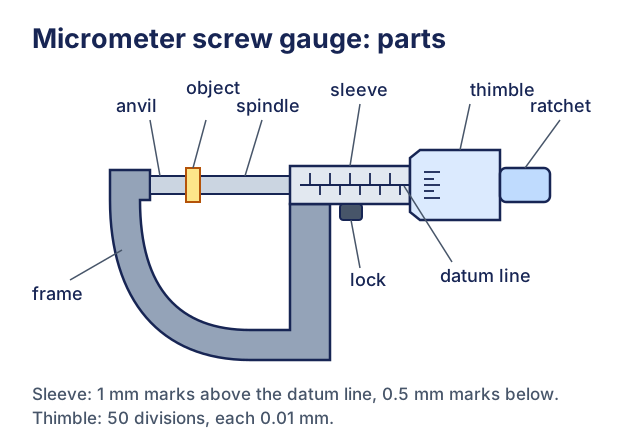
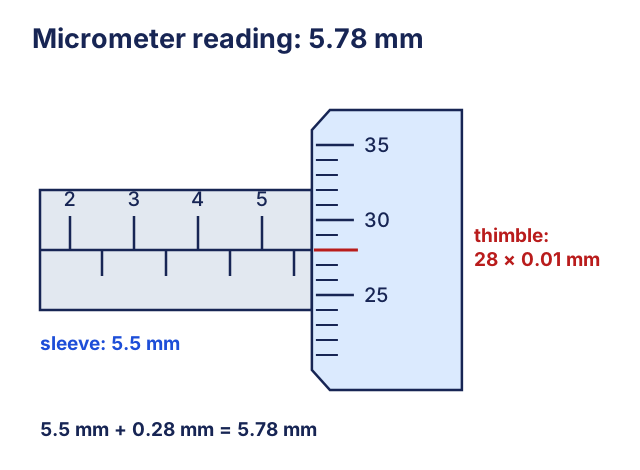
C. Reading an analogue micrometer (no zero error)
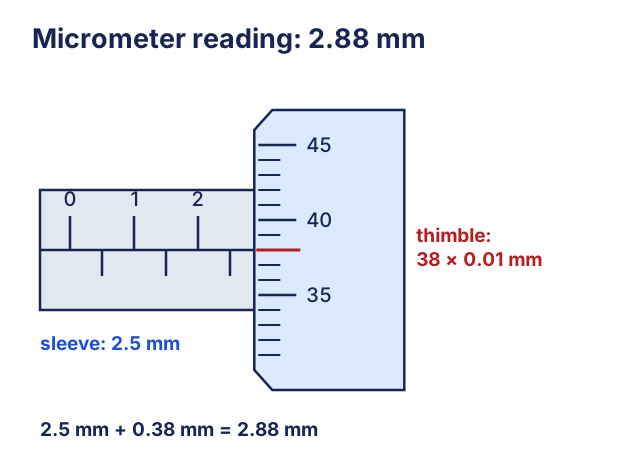
- Sleeve reading: read the last visible mm marking (and add 0.5 mm if the half-mm line is visible).
- Thimble reading: read the thimble division that lines up with the datum line, then multiply by 0.01 mm.
- Add: observed reading = sleeve + thimble.
Mini-example:
D. Another analogue example
E. Correcting for zero error (works for positive and negative)
Use one rule for both signs:
correct reading = observed reading - zero error
- For the conventional scale orientation pictured, a positive zero error has the thimble’s zero below the datum line when fully closed.
- For that pictured orientation, a negative zero error has the thimble’s zero above the datum line when fully closed. Read the actual closed-instrument scale supplied.
Mini-example:
Observed reading = 1.76 mm, zero error = +0.01 mm.
Correct reading = 1.76 - 0.01 = 1.75 mm.
4. Common Mistakes
A. Scale-reading mistakes
- Missing the 0.5 mm sleeve line when it is visible.
- Reading the thimble from the wrong line (use the datum line).
- Mixing up resolutions: a digital micrometer reads to 0.001 mm and an analogue thimble to 0.01 mm. Recording fewer decimal places than the instrument gives throws away precision.
B. Zeroing and technique mistakes
- Not checking the zero before measuring.
- Forgetting to correct for zero error when it is given.
- Bypassing the specified force control or overtightening the spindle, which can deform a soft object.
5. Exam Tips
A. How to present your working
- Write your method in a mark-scheme-friendly order:
- sleeve reading
- thimble reading
- observed reading
- corrected reading (if there is zero error)
- Quote to the instrument’s resolution: 0.001 mm for a digital micrometer, 0.01 mm for an analogue screw gauge.
- If asked about reliability: mention repeat readings and average (random error) and correct zero error (systematic error).
- If a question gives both observed reading and closed-jaws reading, always show the correction step explicitly:
correct = observed - zero error.
5A. Interactive Micrometer Trainer
A micrometer screw gauge open beside a wire. Drag the thimble to close the spindle on the wire.
- Check
- Turn the thimble until the spindle just touches the object.
Try this
0 of 4 doneClose the micrometer on the wire and enter its thickness to 0.01 mm. (not done yet)
Reading = sleeve reading (including any half-millimetre mark) + thimble division × 0.01 mm.
Read a wire where a half-millimetre mark is showing on the sleeve. (not done yet)
Two turns of the thimble move the spindle 1 mm, so check below the datum line for the half-millimetre mark.
Read three different wires. (not done yet)
Turn on a zero error and give a corrected reading. (not done yet)
Corrected reading = reading shown − zero error. Find the zero error by closing the micrometer with nothing inside.
6. Worked Examples
Modelled example 3
Thimble scale: smallest and largest readings
Problem
A micrometer thimble has 50 divisions, each worth 0.01 mm. State the resolution and the largest labelled thimble contribution before it returns to zero.
Study the worked solution
Identify the resolution
Method
Use the value of one thimble division.Reason
Resolution is the smallest scale change directly indicated.
Working
Resolution = 0.01 mm.Identify the last division before rollover
Method
Use division 49 as the greatest labelled contribution before division 0 returns.
Reason
The 50th increment advances the sleeve by 0.50 mm and the thimble numbering cycles to zero.
Working
Largest thimble reading = 49 × 0.01 = 0.49 mm.
Guided practice 4
Read an analogue micrometer (no zero error)
Problem
Sleeve reading = 4.5 mm and thimble alignment is at 22 divisions. Find the observed reading.
Combine the two scales
Hints
Hint 1: convert the thimble first
22 × 0.01 mm is the fractional contribution.
Hint 2: include the visible half millimetre
The sleeve reading already includes the visible 0.5 mm mark.
View solution step by step
Read the thimble contribution
Method
Multiply the aligned division by the least count.Reason
The thimble records the fraction beyond the sleeve reading.
Working
22 × 0.01 mm = 0.22 mm
Add sleeve and thimble
Method
Combine the complete sleeve reading and the thimble contribution.
Reason
No zero error is stated.Working
4.5 mm + 0.22 mm = 4.72 mm
Examiner practice 5
Correct for zero error
Examination question
Observed reading = 3.15 mm and positive zero error = +0.02 mm. Find the correct reading, showing the signed correction. [3 marks]
Show rule, substitution and result
View solution step by step
State the correction rule
1 markMethod
Write corrected reading as observed reading minus zero error.Reason
The signed rule applies to either zero-error direction.Working
correct = observed-zero errorSubstitute and evaluate
2 marksMethod
Subtract the positive offset and include the unit.Reason
A positive zero error makes the observed value too large.Working
3.15 mm-(+0.02 mm) = 3.13 mm
Self-mark with the mark scheme
Compare your response with each mark point. Select a point only when your response contains that evidence.
Self-mark the signed correction.
7. Mind Stretchers
Mind stretcher 2: Why take repeated readings for a wire?Extension
A student measures a wire diameter at one point only and gets 0.52 mm. Another student measures at 5 points and averages. Why is the second method better?
Show Answer
- A wire may not be perfectly uniform; readings can vary along its length.
- Repeating and averaging reduces the effect of random error and gives a more reliable estimate.
Mind stretcher 3: Precision vs accuracyExtension
A micrometer gives very consistent readings (same value each time), but the instrument has a zero error that the student ignores. Describe the accuracy and precision of the results.
Show Answer
- Precision: high (readings are consistent / close together).
- Accuracy: poor (all readings are shifted by the zero error).
Practise and check
Use the Measurement topic check to practise and check your understanding.
Syllabus and review details
- SEC G3 Physics 2027 · 2027
Content Structure, PDF page 9; Subject Content, PDF pages 10–28