Table of Contents
Understanding Vernier Caliper
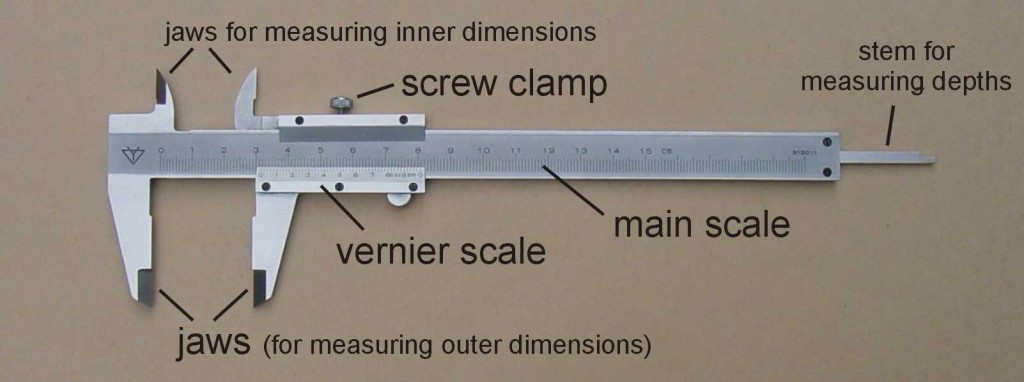
Vernier calipers are precision instruments used for measuring internal and external dimensions accurately. Their measurements are presented in centimeters (cm) and are precise to two decimal places, for example, 1.23 cm. This guide will cover the essential aspects of reading measurements from a vernier caliper, applicable to models that use inches as well.
Main Scale:
- The main scale is a fixed scale on the caliper and is typically graduated in millimeters or inches, depending on the unit of measurement.
- Each division on the main scale represents a specific measurement unit, and it provides the whole number part of the measurement.
Vernier Scale:
- The Vernier scale is a secondary scale that slides parallel to the main scale. It has a series of divisions that are slightly smaller than those on the main scale.
- The zero (0) point on the Vernier scale corresponds to a specific point on the main scale, ensuring alignment during measurements.
Alignment:
- To read the Vernier scale, align the zero (0) point of the Vernier scale with the closest point on the main scale.
- Look for the first line on the Vernier scale that aligns perfectly with a line on the main scale. This indicates the fraction or decimal part of the measurement.
Measurement Reading Technique For Vernier Caliper
In order to read the measurement readings from vernier caliper properly, you need to remember two things before we start. For example, if a vernier caliper output a measurement reading of 2.13 cm, this means that:
- The main scale contributes the main number(s) and one decimal place to the reading (E.g. 2.1 cm, whereby 2 is the main number and 0.1 is the one decimal place number)
- The vernier scale contributes the second decimal place to the reading (E.g. 0.03 cm)
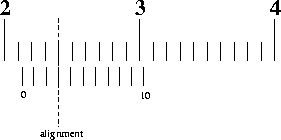
Let’s examine the image of the vernier caliper readings above. We will just use a two steps method to get the measurement reading from this:
- To obtain the main scale reading: Look at the image above, 2.1 cm is to the immediate left of the zero on the vernier scale. Hence, the main scale reading is 2.1 cm
- To obtain the vernier scale reading: Look at the image above and look closely for an alignment of the scale lines of the main scale and vernier scale. In the image above, the aligned line correspond to 3. Hence, the vernier scale reading is 0.03 cm.
In order to obtain the final measurement reading, we will add the main scale reading and vernier scale reading together. This will give 2.1 cm + 0.03 cm = 2.13 cm.
In A Nutshell
Use the following formula:
$$ \text{Obtained reading} = \text{Main scale reading} \, + \, \text{Vernier scale reading} $$
Let’s go through another example to ensure that you understand the above steps:
Main scale reading: 10.0 cm (Immediate left of zero)
Vernier scale reading: 0.02 cm (Alignment of scale lines)
Measurement reading: 10.02 cm
Compensating For Zero Error
It’s crucial to account for any zero error, which can be either negative or positive, based on the Vernier scale’s zero point relative position to the main scale’s zero. Correct readings are found by adjusting the observed measurement for this zero error.
In A Nutshell
Use the following formula:
$ \text{Correct reading} = \text{Obtained reading} \, – \, \text{Zero error} $
where $\text{zero error}$ can be either negative (the “0” of vernier scale is left of the “0” of the main scale) or positive (the “0” of vernier scale is right of the “0” of the main scale)
OR
Memorize this:
- Negative Zero Error: Indicates the Vernier zero is left of the main scale zero, requiring an addition to the reading.
- Positive Zero Error: Indicates the Vernier zero is right of the main scale zero, necessitating a subtraction from the reading.
Explanation On Zero Error Formula
Now, we shall try with zero error. If you are not familiar on how to handle zero error for vernier calipers, I suggest that you read up on Measurement of Length.
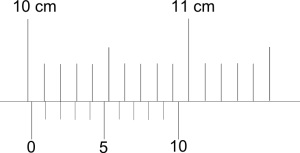
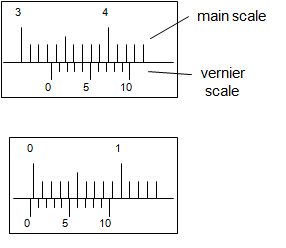
The reading on the top is the measurement obtained and the reading at the bottom is the zero error. Find the actual measurement. (Meaning: get rid of the zero error in the measurement or take into account the zero error)
Measurement with zero error: 3.34 cm
Zero error: $-0.04 \text{ cm}$ (negative because the vernier scale is to the left)
Measurement without zero error: $3.34-(-0.04)=3.38$ cm
If you do not understand the subtraction of the negative zero error from the measurement, please read on.
- Since the zero error is $-0.04 \text{ cm}$, this means that all measurements taken by the vernier calipers will be SMALLER by 0.04cm.
- Hence, you will have to ADD 0.04 cm to ALL measurements in order to get the TRUE measurement.
- The subtraction is done in the above case is to have an elegant way of obtaining a resultant addition: $3.34 + 0.04 = 3.38$ and to make it COMPATIBLE with positive zero error.
- This means that once you have determined the nature of the zero error (positive or negative), you can just subtract the zero error and be sure that your final answer is correct.
Consider a zero error of +0.04 cm. With my method, $3.34-(+0.04) = 3.30$ cm.
Normal method: Since the zero error is +0.04 cm, this means that all measurements taken by the vernier calipers will be larger by 0.04 cm. Hence, you will have to SUBTRACT 0.04 cm from ALL measurements in order to get the true measurement. The final calculation will be $3.34-0.04 = 3.30$ cm, which is the same as my method.
Note: I hope that I did not confuse you. Drop a comment below if you encounter any difficulties.
Common Mistakes When Reading Vernier Caliper Measurements
Despite the simplicity of reading a Vernier caliper, common mistakes can occur. Here are some potential errors and troubleshooting tips:
Misalignment:
- Mistake: Incorrectly aligning the zero (0) point of the Vernier scale with the main scale.
- Troubleshooting: Double-check the alignment before recording measurements. Ensure the zero point aligns precisely with the main scale.
Parallax Error:
- Mistake: Reading the measurement from an angle, causing a parallax error.
- Troubleshooting: View the Vernier scale and main scale directly from above to avoid parallax errors. Ensure your line of sight is perpendicular to the caliper.
Decimal Point Misinterpretation:
- Mistake: Misinterpreting the decimal point on the Vernier scale, leading to errors in the recorded measurement.
- Troubleshooting: Pay close attention to the position of the decimal point on the Vernier scale. Be mindful of whether it aligns with a main scale division or falls in between two divisions.
Vernier Scale Orientation:
- Mistake: Reading the Vernier scale upside down or in the wrong orientation.
- Troubleshooting: Always check that the Vernier scale is positioned correctly. The scale should slide parallel to the main scale, and the numbers and divisions should be easily readable.
Jaw Misalignment:
- Mistake: The jaws of the Vernier caliper are not properly aligned when measuring, leading to inaccurate results.
- Troubleshooting: Ensure that the jaws of the caliper are clean and properly aligned. Any misalignment can affect the accuracy of the measurement. If misalignment persists, the caliper may require adjustment or repair.
Neglecting Zero Error:
- Mistake: Neglecting to account for zero errors in the calibration of the Vernier caliper.
- Troubleshooting: Regularly check for zero errors by closing the jaws without any object in between. The zero on the Vernier scale should align precisely with the zero on the main scale. If there is a deviation, note the zero error and adjust future measurements accordingly.
More Vernier Caliper Practice:
Worked Examples
Example 1
Where on the vernier calipers would you read to obtain the main scale reading?
Show/Hide Answer
The main scale reading is obtained from the reading on the main scale that is at the immediate left of the zero on the vernier scale.
Example 2
Where on the vernier calipers would you read to obtain the vernier scale reading?
Show/Hide Answer
The vernier scale reading is obtained from the reading on the main scale that has an alignment of the scale lines of the main scale and vernier scale.
Example 3
What is the smallest possible reading (in cm) of a vernier caliper?
Show/Hide Answer
The smallest possible reading of a vernier caliper is 0.01 cm.
Example 4: Basic Measurement Reading
You’re measuring the diameter of a small steel ball using a vernier caliper. The main scale reading just before the zero of the Vernier scale is 1.2 cm. The 6th line on the Vernier scale aligns perfectly with a line on the main scale. Calculate the diameter of the steel ball.
Show/Hide Answer
Main Scale Reading = 1.2 cm
Vernier Scale Reading = 0.06 cm (Each line on the Vernier scale represents 0.01 cm, so the 6th line indicates an additional 0.06 cm.)
Total Measurement = Main Scale Reading + Vernier Scale Reading = 1.2 cm + 0.06 cm = 1.26 cm
The diameter of the steel ball is 1.26 cm.
Example 5: Identifying Zero Error
Upon closing the jaws of the vernier caliper without any object between them, you notice the zero mark of the Vernier scale is to the right of the main scale’s zero by 0.02 cm. When measuring a wire thickness, the main scale reads 0.5 cm, and the 8th line on the Vernier scale aligns with the main scale. What is the correct thickness of the wire?
Show/Hide Answer
Observed Main Scale Reading = 0.5 cm
Vernier Scale Reading = 0.08 cm
Observed Total Measurement = 0.5 cm + 0.08 cm = 0.58 cm
Zero Error = +0.02 cm (Positive because the Vernier zero is right of the main scale zero.)
Correct Measurement = Observed Measurement – Zero Error = 0.58 cm – 0.02 cm = 0.56 cm
The correct thickness of the wire is 0.56 cm.
Example 6: Advanced Measurement with Negative Zero Error
Before measuring an object, you notice that the zero on the Vernier scale is slightly to the left of the main scale’s zero by 0.03 cm (negative zero error). The object’s measurement shows a main scale reading of 2.5 cm and the 10th line on the Vernier scale aligns with the main scale. What is the object’s actual size?
Show/Hide Answer
Main Scale Reading = 2.5 cm
Vernier Scale Reading = 0.1 cm
Observed Total Measurement = 2.5 cm + 0.1 cm = 2.6 cm
Zero Error = -0.03 cm (Negative because the Vernier zero is left of the main scale zero.)
Correct Measurement = Observed Measurement – Zero Error = 2.6 cm – (-0.03 cm) = 2.63 cm
The actual size of the object is 2.63 cm.
Example 7: Complex Scenario with Positive Zero Error
You are measuring the length of a pencil using a vernier caliper and observe a positive zero error of 0.01 cm. The main scale reading is exactly at 7.5 cm, and the 15th line on the Vernier scale matches up with the main scale. Calculate the pencil’s accurate length.
Show/Hide Answer
Main Scale Reading = 7.5 cm
Vernier Scale Reading = 0.15 cm (since each division is 0.01 cm)
Observed Total Measurement = 7.5 cm + 0.15 cm = 7.65 cm
Zero Error = +0.01 cm
Correct Measurement = Observed Measurement – Zero Error = 7.65 cm – 0.01 cm = 7.64 cm
The accurate length of the pencil is 7.64 cm.
Example 8: Measuring with Misalignment Consideration
During a measurement, you fail to notice a slight misalignment, resulting in a zero error of -0.04 cm. The main scale reading before the zero of the Vernier scale reads 3.0 cm, and the 12th line on the Vernier scale is aligned with the main scale. Correct the measurement considering the misalignment.
Show/Hide Answer
Main Scale Reading = 3.0 cm
Vernier Scale Reading = 0.12 cm
Observed Total Measurement = 3.0 cm + 0.12 cm = 3.12 cm
Zero Error = -0.04 cm (Negative because of misalignment to the left.)
Correct Measurement = Observed Measurement – Zero Error = 3.12 cm – (-0.04 cm) = 3.16 cm
The correct measurement, taking into account the misalignment, is 3.16 cm.
If you still do not understand the concept, there is a very useful simulation of the vernier calipers: Vernier Caliper Simulation (Source)


