How To Use Calipers (Digital + Vernier)
Key idea: How to use digital and vernier calipers for O Level Physics practical: reading scales, correcting zero error, avoiding parallax, and common exam mistakes.
Continue where you stopped
The core idea
On this page
Learning objectives
- Represent a physical quantity with a numerical magnitude and unit
- Recall the six prescribed SI base quantities and their units
- Use the prescribed SI prefixes from nano to tera
- Compare orders of magnitude from a typical atom to the Earth
- Select and justify measuring instruments by range and precision
- Distinguish scalar and vector quantities and give examples
- Add two vectors graphically to determine a resultant
1. Definition
A. Digital caliper (recommended)
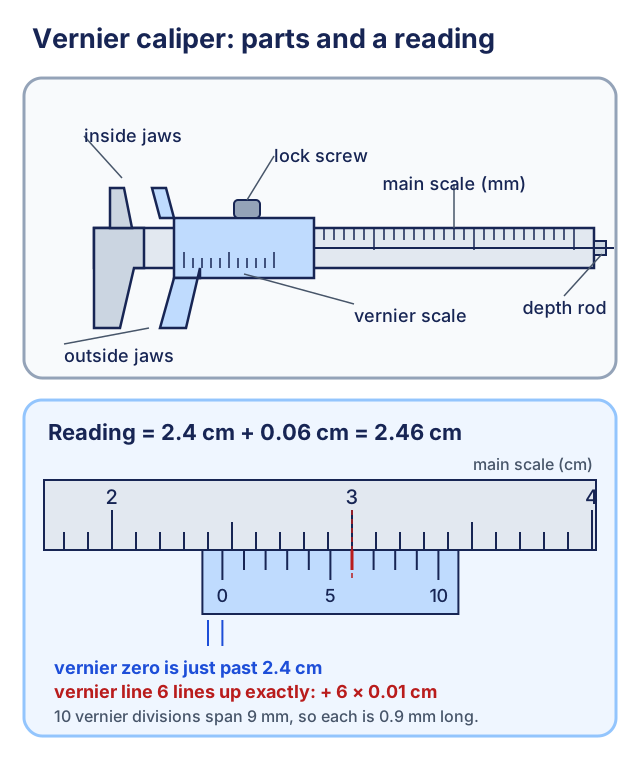
A digital caliper measures internal diameters, external diameters, and depths, and displays the reading directly (usually in mm).
B. Vernier caliper (vernier scale)
A vernier caliper is an analogue caliper that uses a main scale and a vernier scale to read lengths to a fine resolution (commonly 0.01 cm).
2. Key Ideas
- Digital caliper: close → ZERO → measure gently → record the display value with units.
- Vernier caliper:
- Observed reading = main scale reading + vernier reading.
- Corrected reading = observed reading - zero error.
- Avoid parallax: read the scale straight-on, not at an angle.
- Record to a sensible precision (match the instrument’s resolution).
3. Detailed Explanations
A. Digital caliper workflow (quick)
- Close the jaws gently and press ZERO (make sure the jaws are clean).
- Select units (
mm). - Use the correct part:
- outside jaws: external diameter / thickness
- inside jaws: internal diameter
- depth rod: depth
- Record the displayed value with units (e.g.
12.34 mm).
If it won’t zero, treat the offset as a zero error and correct for it (same idea as vernier): see Accuracy, Precision & Measurement Errors.
B. Vernier caliper scales
C. Reading a vernier caliper (no zero error)
- Main scale reading: the value on the main scale immediately to the left of the vernier zero.
- Vernier reading: find the vernier division that lines up exactly with a main-scale line.
- Add: observed reading = main scale + vernier reading.
Mini-example:

D. Correcting for zero error (works for positive and negative)
Use one rule for both signs:
correct reading = observed reading - zero error
- Positive zero error: vernier zero is to the right of main zero.
- Negative zero error: vernier zero is to the left of main zero.
Mini-example: observed reading 3.34 cm, zero error -0.04 cm.
Correct reading = 3.34 - (-0.04) = 3.38 cm.
E. Avoiding parallax (vernier)
- Put your eye directly above the scale line you’re reading.
- Make sure the jaws touch the object gently and squarely (don’t tilt the caliper).
4. Common Mistakes
A. Reading errors
- Taking the main-scale value to the right of the vernier zero (it should be to the left).
- Choosing a line that “almost” aligns; select the one that aligns best.
- Forgetting to correct for zero error when it is given.
- Writing the observed reading as the final answer when the question asks for the corrected reading.
B. Practical technique errors
- Viewing at an angle (parallax error).
- Squeezing the object (especially soft materials), changing the size.
- Recording without units or using the wrong unit (cm vs mm).
5. Exam Tips
A. What to write for full marks
- Show the method:
- main scale reading
- vernier reading (include least count)
- observed reading
- corrected reading (if there is zero error)
- Use the exact wording: “correct reading = observed - zero error”.
- Quote values to the correct resolution (often 0.01 cm for vernier scale questions).
- If your corrected value is further from the observed value than expected, re-check the sign of zero error from the closed-jaws diagram first.
5A. Interactive Trainer (First-Party)
Simulation Trainer: Vernier Caliper Reading
Train the no-zero-error vernier workflow: main scale, aligned division, final reading in cm.
- Main Scale Reading
- Vernier Alignment
- Instrument Precision
6. Worked Examples
Modelled example 1
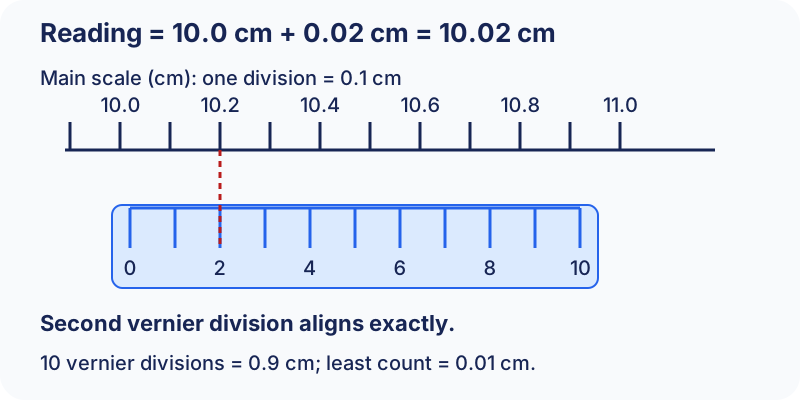
Read the main scale and vernier scale (no zero error)
Problem
Study the worked solution
Read the main scale
Method
Take the main-scale value immediately left of the vernier zero.Reason
The vernier zero has passed that complete main-scale interval but not the next one.Working
Main scale reading = 10.0 cm.Read the aligned vernier division
Method
Find the vernier line that aligns best and multiply its index by the least count.Reason
The aligned division supplies the fractional part beyond the main-scale reading.Working
Vernier reading = 2 × 0.01 cm = 0.02 cm.Combine the readings
Method
Add the main-scale and vernier contributions.Reason
There is no stated zero error in this example.Working
10.0 + 0.02 = 10.02 cm
Guided practice 2
Correct a zero error using the closed-jaws reading
Problem

Observed reading = 3.34 cm and zero error = -0.04 cm. Find the corrected reading.
Apply the signed correction
Hints
Hint 1: write the rule before substituting
Hint 2: preserve the sign
View solution step by step
Substitute the signed zero error
Method
Place the negative offset in brackets.Reason
The correction rule works for both positive and negative zero errors when the sign is preserved.Working
correct = 3.34-(-0.04)Evaluate and report
Method
Subtract the negative value and retain the instrument precision.Reason
A negative closed-jaws reading means the observed object reading is too small by 0.04 cm.Working
correct = 3.38 cm
Common misconception 3
Correct a positive zero error
Learner response
Diagnose before viewing the repair
View solution step by step
Interpret the positive offset
Method
Recognise that the caliper reads above zero when fully closed.Reason
The same positive offset makes the observed object reading too large.Working
Use correct = observed-zero error.Correct the reading
Method
Subtract the signed positive error.Reason
Removing the over-reading restores the best estimate of the object length.Working
7.65-(+0.01) = 7.64 cm
Examiner practice 4
Digital caliper (unit conversion)
Examination question
Show conversion and result
View solution step by step
Use the millimetre–centimetre relationship
1 markMethod
Divide the millimetre value by 10.Reason
One centimetre contains 10 millimetres.Working
12.34÷10 = 1.234Report the converted length
1 markMethod
Attach the requested unit without discarding significant measured digits.Reason
Changing unit changes the decimal position, not the physical precision.Working
12.34 mm = 1.234 cm
Self-mark with the mark scheme
Compare your response with each mark point. Select a point only when your response contains that evidence.
Self-mark the conversion.
Challenge 5
Digital caliper zero error correction
Digital transfer
Transfer the signed rule to a digital display
Hints
Hint 1: reuse the signed correction rule
Hint 2: interpret the closed display
View solution step by step
Apply the signed correction
Method
Subtract the negative closed-jaws reading.Reason
The same rule applies whether the offset is read on an analogue scale or a digital display.Working
correct = 8.16-(-0.02) = 8.18 mmExplain the direction
Method
State why the corrected result increases.Reason
A negative zero offset makes the uncorrected object reading too small.Working
Subtracting the negative offset is algebraically equivalent to adding 0.02 mm.
7. Mind Stretchers
Mind stretcher 1: Why is zero error a systematic error?Extension
A student forgets to correct for a constant zero error when measuring the diameter of a wire.
- Is the error random or systematic?
- How does it affect accuracy and precision?
Show Answer
- It is a systematic error because every reading is shifted by the same amount.
- Accuracy becomes worse (all readings are too large or too small).
- Precision can still be good (readings may be tightly clustered).
Mind stretcher 2: Choosing better techniqueExtension
Two students measure the same rod with a vernier caliper:
- Student A squeezes hard until the jaws “bite”.
- Student B closes gently, checks for dirt, and reads at eye level.
Whose result is more reliable, and why?
Show Answer
- Student B’s result is more reliable.
- Gentle contact avoids deforming the object and reduces inconsistent pressure.
- Eye-level reading reduces parallax error.
Continue with the next resource in this course.
Course and syllabus information
- Course
- SEC G3 Physics
- Edition
- SEC G3 Physics 2027