Table of Contents
Ray Diagrams For Converging Lens
Ray diagrams for converging lenses are used to determine the position, size, orientation, and type of image formed when an object is placed at various distances from the lens. Converging lenses, also known as convex lenses, are thicker at the center than at the edges and cause parallel rays of light to converge (come together) at a point known as the focal point. The steps to draw ray diagrams for converging lenses involve tracing at least two of the three principal rays from an object through the lens to predict where the image will form.
3 Rays Of Ray Diagrams For Converging Lens
3 Important Rays:
- Principal Ray 1 (Parallel Ray): This ray travels parallel to the principal axis (the horizontal line passing through the center of the lens) towards the lens and, after refraction, passes through the focal point on the opposite side of the lens.
- Principal Ray 2 (Central Ray): This ray passes through the center of the lens and continues in a straight line, without bending. This is because the thickness of the lens is the same at this point, so there’s no refraction.
- Principal Ray 3 (Focal Ray): This ray approaches the lens in such a way that its extension back intersects the focal point on the same side of the lens as the object. After passing through the lens, it refracts and travels parallel to the principal axis.
By tracing these rays, you can find where they converge on the opposite side of the lens, which will give you the location of the image. The point where at least two of the rays intersect indicates the top of the image formed by the lens.
In Simpler Form:
- There is one ray of light passing through the center of the lens. Always.
- 2 rays are enough to determine the position of image/object.
- The other ray of light ALWAYS passes through the focal point of the lens. Either the first focal point of the second focal point.
- If a ray passes through the focal point before passing through the lens, the refracted ray will be travelling parallel to principal axis.
- If a ray is parallel to principal axis before passing through the lens, the refracted ray will pass through the focal point.
Tips:
- Use solid lines for real light rays and put arrowheads to indicate direction
- Use dotted lines for extended light rays (virtual light rays) and do not add arrowhead
- Use solid lines for real images and dotted lines for virtual images
Characteristics Of Image
By analyzing the intersection of these rays, you can determine the characteristics of the image:
- Position: Whether the image is formed on the same side as the object (virtual) or on the opposite side (real).
- Size: Whether the image is magnified or reduced compared to the object.
- Orientation: Whether the image is upright (same orientation as the object) or inverted (opposite orientation to the object).
- Type: Whether the image is real (can be projected on a screen) or virtual (cannot be projected, only seen through the lens).
The nature of the image (real or virtual) and its size (magnified or diminished) depend on the object’s distance from the lens relative to the focal length. Here are some general rules:
- If the object is beyond the focal length (but not at infinity), the image formed is real, inverted, and can be magnified or reduced.
- If the object is at the focal length, no real image is formed because the rays parallel to the principal axis, after refraction, will not converge.
- If the object is between the lens and the focal point, the image formed is virtual, upright, and magnified.
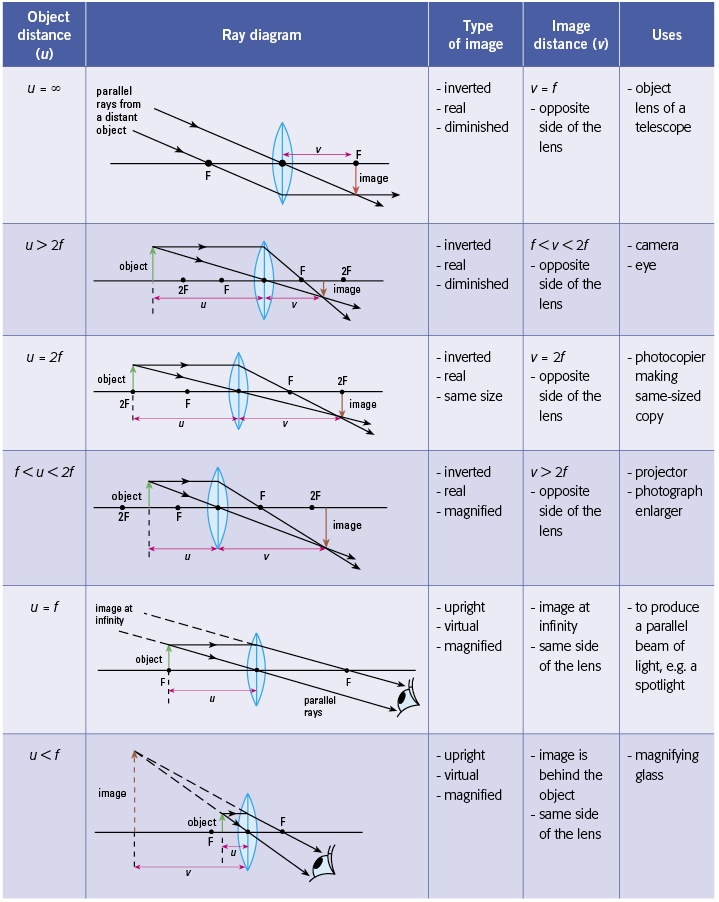
Table Showing Ray Diagrams Of Common Converging Lens Configurations
You can check the tricks above with the diagrams below.
Or:
| Object Distance (u) | Ray Diagram | Type of Image | Image Distance (v) | Uses |
|---|---|---|---|---|
| u = ∞ | Parallel rays from a distant object. Converging rays at F | Inverted, Real, Diminished | v = f (Opposite side of the lens) | Object lens of a telescope |
| u > 2f | Converging rays before 2F | Inverted, Real, Diminished | f < v < 2f (Opposite side of the lens) | Camera, Eye |
| u = 2f | Converging rays at 2F | Inverted, Real, Same size | v = 2f (Opposite side of the lens) | Photocopier making same-sized copy |
| f < u < 2f | Converging rays after 2F | Inverted, Real, Magnified | v > 2f (Opposite side of the lens) | Projector, Photograph enlarger |
| u = f | Rays pass through F and diverge | Upright, Virtual, Magnified | Image at infinity (Same side of the lens) | To produce a parallel beam of light, e.g., a spotlight |
| u < f | Diverging rays from a point within F | Upright, Virtual, Magnified | Image behind the object (Same side of the lens) | Magnifying glass |
Note:
- An image that is real is always inverted!
- An image that is virtual is always upright!
Worked Examples
Example 1: Principal Ray Identification
Describe the path of Principal Ray 2 after it passes through a converging lens. Why does it follow this path?
Click here to show/hide answer
Principal Ray 2 passes through the center of the converging lens and continues in a straight line without bending. This behavior occurs because the thickness of the lens at the center is consistent, resulting in no refraction of this particular ray. This principle helps in determining the orientation of the image formed by the lens.
Example 2: Image Formation
An object is placed beyond the focal length of a converging lens. Describe the characteristics of the image formed (position, size, orientation, and type).
Click here to show/hide answer
When an object is placed beyond the focal length of a converging lens, the image formed is on the opposite side of the lens from the object, indicating it is a real image. The image can be magnified or reduced, depending on the object’s distance from the lens. It is always inverted, showing an opposite orientation to the object. Being real, this image can be projected onto a screen.
Example 3: Virtual Image Scenario
What happens to the image formed when the object is placed between the lens and the focal point of a converging lens?
Click here to show/hide answer
When the object is placed between the lens and the focal point of a converging lens, the image formed is virtual, upright, and magnified. This virtual image appears on the same side of the lens as the object and cannot be projected onto a screen, but can only be seen through the lens.
Example 4: Ray Diagram Drawing
How would you use Principal Ray 1 and Principal Ray 3 to locate the image formed by a converging lens if the object is placed at twice the focal length from the lens?
Click here to show/hide answer
To locate the image using Principal Ray 1, draw a ray parallel to the principal axis from the top of the object towards the lens. After passing through the lens, this ray will refract and pass through the focal point on the opposite side. For Principal Ray 3, draw a ray from the top of the object such that it passes through the focal point on the same side of the lens as the object. After refraction, this ray will travel parallel to the principal axis. The point where these refracted rays intersect on the opposite side of the lens indicates the top of the image, which in this case will be real, inverted, and of the same size as the object (since it is placed at twice the focal length).
Example 5: No Image Formation Scenario
Explain what happens when an object is placed exactly at the focal length of a converging lens.
Click here to show/hide answer
When an object is placed exactly at the focal length of a converging lens, no real image is formed. This is because the rays parallel to the principal axis, after refraction by the lens, emerge parallel and therefore do not converge to form an image on the opposite side of the lens. This specific placement causes the rays to spread out, indicating that the image cannot be projected onto a screen or seen through the lens.
Example 6: Telescope Lens Configuration
When an object is placed at an infinite distance (u = ∞) from a converging lens, what are the characteristics of the image formed, and what common optical device uses this configuration?
Click here to show/hide answer
For an object at an infinite distance, the image formed is inverted, real, and diminished. The image distance (v) is equal to the focal length (f), located on the opposite side of the lens. This configuration is commonly used as the objective lens of a telescope.
Example 7: Photocopier Optics
Describe the image characteristics and application when the object distance (u) is exactly twice the focal length (2f) from a converging lens.
Click here to show/hide answer
When the object distance is exactly twice the focal length (u = 2f), the image formed is inverted, real, and the same size as the object. The image distance (v) also equals 2f, positioned on the opposite side of the lens. This setup is typically used in photocopiers to make same-sized copies.
Example 8: Magnifying Glass Principle
What happens to the image when the object is placed within the focal length (u < f) of a converging lens, and what is a practical use of this configuration?
Click here to show/hide answer
If the object is placed within the focal length of a converging lens (u < f), the resulting image is upright, virtual, and magnified. The image appears to be located behind the object, on the same side of the lens. This principle is utilized in a magnifying glass to enlarge the appearance of small details.
Example 9: Camera Lens Setting
For an object distance greater than twice the focal length (u > 2f), what are the image characteristics, and in what devices is this configuration commonly found?
Click here to show/hide answer
With the object distance greater than twice the focal length (u > 2f), the image is inverted, real, and diminished. The image distance (v) falls between the focal length and twice the focal length (f < v < 2f) on the opposite side of the lens. This configuration is commonly found in cameras and the human eye.
Example 10: Projector Functionality
Explain the image properties and the application of a converging lens when the object is placed between the focal length and twice the focal length (f < u < 2f).
Click here to show/hide answer
When the object is positioned between the focal length and twice the focal length (f < u < 2f) of a converging lens, the image produced is inverted, real, and magnified. The image distance (v) is greater than twice the focal length (v > 2f), located on the opposite side of the lens. This setup is used in projectors and photograph enlargers to magnify images onto a screen or surface.